
How to Safely Remove a Wasp Nest – Step-by-Step Guide
Encountering a wasp nest in your vicinity can be daunting, and removing it requires careful and strategic measures to avoid harmful stings. Are you uncertain about how to manage this threat without jeopardizing your safety? Fear not! We are here to guide you through it. This blog post will illustrate a step-by-step process for the safe removal of a wasp nest, ensuring the protection of your home, family, and yourself from these unexpected invaders. Navigate the complexities of pest control with confidence as we take you through this journey together. Please remember that if the situation is dire or overwhelming, professional intervention is always available and just one call away. Stay tuned – education is the key to effective pest control.
The safest way to remove a wasp nest is by hiring a professional pest control company with experience in wasp nest removal. Attempting to remove a nest yourself can result in serious injury from wasp stings. If you must remove the nest yourself, be sure to wear protective clothing, such as long-sleeve shirts, pants, gloves, and a hat with a veil. It’s best to approach the nest at night when most of the wasps are inside. Use approved pesticides or natural remedies, such as boiling water and dish soap or peppermint oil mixed with water, depending on the location of the nest and type of wasp. Remember to read all label instructions carefully before use.
Identifying Wasp Variety and their Nests
When it comes to safely removing a wasp nest, it’s important to start by identifying the variety of wasps in question and understanding their nesting habits. Different types of wasps have distinct behaviors, aggression levels, and preferred nesting locations. By being able to differentiate between them, you can better tailor your approach to effectively remove the nest without posing unnecessary risks.
Let’s take a closer look at three common types of wasps: paper wasps, yellow jackets, and hornets.
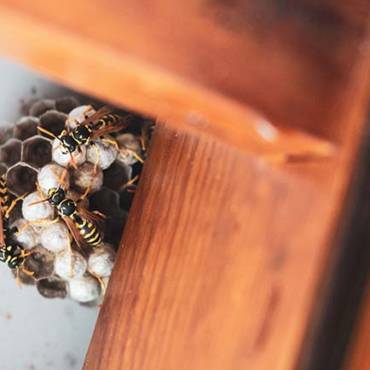
Paper Wasps: Paper wasps are social insects that construct open-faced nests made from chewed wood fibers mixed with saliva, giving them their papery appearance. These nests often hang from branches, twigs, or structures such as eaves or porches. Paper wasps are generally less aggressive compared to yellow jackets and hornets unless provoked or their nest is threatened.
Imagine noticing a paper wasp nest hanging under the eave of your house. You might see the distinctive honeycomb-like structure with cells where individual wasps reside.
Yellow Jackets: Yellow jackets are known for their aggressive nature and can inflict painful stings. They build large nests underground or in cavities like tree stumps or wall voids. These nests are usually not visible unless disturbed or during specific times when foraging activity increases.
Picture uncovering a hidden yellow jacket nest while cleaning out an old garden shed; they may suddenly swarm out aggressively and defend their home.
Hornets: Hornets are larger wasp species known for constructing basketball-sized nests high off the ground. They typically favor elevated areas such as trees, shrubs, or even buildings. Hornets tend to be more territorial and sting if they perceive any threat to their nest.
Imagine discovering a bald-faced hornet nest hanging from a tree branch, its shape resembling a grayish, football-shaped structure.
Identifying the different wasp varieties and understanding their nesting habits is crucial for several reasons. Firstly, it allows you to assess potential dangers and risks associated with removing the nest on your own. For instance, aggressive species like yellow jackets and hornets may require professional assistance due to the potential hazards they pose. Secondly, knowing the nest location provides insight into how accessible or challenging the removal process may be.
Now that we have a foundation for identifying wasp varieties and their nests let’s explore further into each specific type: paper wasps, yellow jackets, and hornets.
Paper Wasps, Yellow Jackets, and Hornets
Paper wasps, yellow jackets, and hornets are distinct wasp species that require different approaches when it comes to removing their nests safely. Understanding their behaviors and nesting characteristics will help you devise an effective plan to address the situation.
When encountering a paper wasp nest, it’s essential to approach cautiously as these wasps are generally less aggressive unless provoked. Wearing appropriate protective clothing such as long sleeves, pants, gloves, and a hat is recommended. Using a broom or long-handled tool, gently scrape or knock down the nest during nighttime when most of the wasps are inside for minimal confrontation.
On the other hand, yellow jackets can present more challenges due to their underground or hidden nest locations. Contacting a professional pest control service is often advisable to ensure safe removal. These experts possess the necessary tools and techniques to handle underground nests without putting oneself at risk for stings.
Imagine discovering a large yellow jacket nest in your backyard near the entrance of your vegetable garden. Calling in professionals to deal with this potentially dangerous situation ensures you can safely enjoy your outdoor space without worry.
Hornets, with their large nests, can be intimidating. It is best to leave the removal of hornet nests to professionals due to their aggressive nature and the potential dangers involved. Experts have both the knowledge and equipment needed to safely handle hornet nests and eliminate them without harm.
Consider a scenario where you spot a hornet nest suspended high in a tree near your children’s play area. Entrusting the removal to professionals ensures the safety of your family and property.
Now that we have explored the specificities of paper wasps, yellow jackets, and hornets, it’s important to understand other aspects related to wasp nest removal techniques.
Nest Appearance and Location
Before embarking on the task of safely removing a wasp nest, it is crucial to accurately identify its appearance and location. Different species of wasps build nests in various locations, each with unique characteristics.
Yellow jackets, for instance, often nest underground or in trees and shrubs, while paper wasps prefer to hang their nests from branches or structures. Bald-faced hornets build their nests in elevated areas such as trees or utility poles, while mud daubers create distinctive mud nests under roof eaves or on porch ceilings.
By understanding these differences, you can better prepare yourself for the specific challenges associated with each type of nest. Additionally, recognizing the appearance of a wasp nest is vital to ensure that it is indeed a wasp nest that requires removal and not a hive belonging to beneficial bees or other insects.
Wasp nests typically have a distinctive papery appearance. They are constructed from chewed wood fibers mixed with saliva, giving them the appearance of brown papery material. However, it’s important to note that the exact appearance may vary based on the species of wasp that built it. Some nests may be small and compact, while others can grow quite large and intricate.
To locate a wasp nest, start by observing the flight patterns of the wasps themselves. Watch where they are coming and going from to identify the entrance to their nest. This observation can guide you in pinpointing the general location of the nest structure.
For example, if you notice a group of wasps continuously flying in and out from under your porch roof, it’s likely that there is a paper wasp nest nestled there.
Remember to approach wasp nests with caution as these stinging insects can become aggressive when disturbed. Taking proper safety measures before attempting removal is essential for your well-being.
- To safely remove a wasp nest, it is important to accurately identify its appearance and location. Different species of wasps build nests in various locations, each with unique characteristics. Recognizing the appearance of a wasp nest is vital to ensure that it is indeed a wasp nest that requires removal and not a hive belonging to beneficial bees or other insects. To locate a wasp nest, start by observing the flight patterns of the wasps themselves and watch where they are coming and going from to identify the entrance to their nest. Remember to approach wasp nests with caution as these stinging insects can become aggressive when disturbed, taking proper safety measures before attempting removal is essential for your well-being.
Safety Measures Before Wasp Nest Removal
Engaging in the removal of a wasp nest requires careful consideration and adherence to safety measures. Before proceeding, it is crucial to prioritize your protection to minimize the risk of stings and any potential allergic reactions.
First and foremost, always wear protective clothing and equipment specifically designed for this purpose. This includes long pants, a long-sleeved shirt, closed-toe shoes, gloves, and eye protection. A hat with a bandana or a beekeeper’s veil is also recommended to cover your face and neck, preventing any accidental exposure.
Additionally, choose clothing that is made of tightly woven fabric to minimize the chances of wasps stinging through the material. Layering your clothing can provide an extra barrier of protection.
It’s important to note that wasps have long, straight stingers that may penetrate lightweight clothing. Therefore, taking precautions like wearing multiple layers can provide extra defense against their venomous stings.
To further ensure your safety during wasp nest removal, consider performing the task during cooler hours when wasps are generally less active, such as early morning or evening. These times are typically when most of the wasps are inside the nest rather than out foraging.
Lastly, keep in mind that removing wasp nests can be dangerous, especially if you are unsure about your own capabilities or if you are dealing with species known for their aggression, such as hornets or yellow jackets. In such cases or if you have concerns about allergies or require the use of ladders for reaching high nests safely, it is advisable to seek professional assistance.
Your well-being should always take priority over attempting dangerous tasks on your own. So don’t hesitate to enlist expert help if necessary.
Protective Clothing and Equipment
When it comes to safely removing a wasp nest, one of the most crucial aspects is ensuring you have the appropriate protective clothing and equipment. Wasps are known for their aggressive nature and potent stings, so it’s essential to take proper precautions to avoid any harm.
First and foremost, dress in long pants and a long-sleeved shirt to minimize exposed skin. Opt for tightly woven fabrics that can make it more difficult for wasp stingers to penetrate lightweight clothing. Layering your clothing is advisable, as it provides an additional barrier of protection.
Gloves are another essential item when dealing with wasps. Choose gloves that cover your hands fully, preferably made of thick material such as leather or sturdy rubber. These will help shield your hands from potential stings while allowing you to handle tools or nest removal equipment confidently.
It’s also crucial to protect your face and head. Wearing a hat or cap can provide some coverage but go the extra mile by tying a bandana around your face, covering your mouth and nose. This added layer acts as a shield against any airborne attacks from angry wasps.
For instance, imagine Jane, an enthusiastic homeowner determined to remove a wasp nest near her porch. She carefully selects long pants, a long-sleeved shirt, gloves made of thick leather and puts on her trusty hat with a securely tied bandana across her face. This ensemble gives her much-needed confidence and peace of mind as she approaches the task at hand.
Additionally, invest in suitable eye protection such as goggles or safety glasses. Wasps can be quite unpredictable when provoked, and their stings near the eyes could cause severe damage or even vision loss. Safeguard your sight by ensuring your eyes are adequately protected throughout the process.
Remember, protective clothing is just one part of the puzzle. Knowing when to seek professional help is equally important, especially in certain situations where the removal process may be hazardous or beyond your capabilities.
When to Seek Professional Help
While DIY approaches can be effective for many wasp nest removals, there are instances when it’s best to leave the task to professionals. Recognizing these situations and understanding when to seek professional help is crucial for your safety and the successful eradication of the nest.
One primary consideration is the location of the nest. If it is situated in a hard-to-reach area, such as high up on a roof or in a tree, attempting to remove it without proper equipment and training can be dangerous. Climbing ladders or working at heights carries its own risks and should be left to professionals who are trained in working safely at elevated positions.
Another factor is the size of the nest and the number of wasps present. Smaller nests with only a few occupants may be manageable for DIY removal. However, larger nests housing large populations of aggressive wasps require specialized techniques and tools that professionals possess. A wrong move during removal can lead to multiple stings and potential harm to yourself or others nearby.
Furthermore, personal safety considerations must be taken into account. If you have a known allergy to wasp stings or any physical condition that could exacerbate reactions, it’s best not to take unnecessary risks. Anaphylactic reactions can occur quickly and pose life-threatening consequences, making it imperative to prioritize your well-being by leaving nest removals to experts.
Think of it like trying to fix a complex electrical issue in your home. While you may attempt simple repairs yourself, more intricate problems require an electrician’s expertise to ensure everything is handled safely and effectively.
Lastly, recurring wasp issues might warrant professional assistance. If you repeatedly find new nests on your property or face ongoing wasp infestations despite your efforts, it indicates a deeper underlying problem. Pest control professionals can assess the situation, identify potential attractants, and implement comprehensive strategies to rid your property of these pests once and for all.
Remember, your safety should always be a top priority. Don’t hesitate to reach out to professionals if any doubts or concerns arise during the wasp nest removal process. Their expertise and specialized equipment can ensure a successful outcome while mitigating risks to yourself and others.
DIY Wasp Nest Removal: A Step-by-Step Guide
While professional help may be necessary in certain situations, you can also take the DIY approach to safely remove a wasp nest from your property. By following a step-by-step guide, you can effectively address the issue and restore peace without putting yourself or others at risk.
The first step is crucial – safety. Before attempting any wasp nest removal, ensure you have the necessary protective clothing and equipment. This includes wearing long pants, a long-sleeved shirt, gloves, closed-toe shoes, and a hat with a bandana or veil to cover your face. It’s important to remember that wasps are more likely to sting than bees, so taking precautions is essential.
Once adequately protected, the next step is to locate the nest. Observe the flight patterns of the wasps to identify their entrance and exit points. This will guide you in finding the actual nest location. However, it’s important to note that different species of wasps have different nesting habits. Yellow jackets tend to nest in trees and shrubs, while paper wasps create hanging nests from branches or structures. Hornets often build their nests in elevated areas, and mud daubers construct mud nests under roof eaves or porches.
After pinpointing the nest, plan your approach. It’s best to do this at night when most of the wasps are inside and less aggressive. However, if it’s necessary to address the nest during the day, proceed with caution. Be aware that certain species might become more aggressive during daylight hours.
Now comes the time for nest disruption. Using a long-handled tool like a broom or scraper, gently disturb the nest to detach it from its location. You can carefully scrape or knock it down using these tools while maintaining a safe distance.
With an understanding of how to approach DIY wasp nest removal, it’s crucial to have the right tools and chemicals at your disposal to ensure an effective and safe process.
Essential Tools and Chemicals
Having the necessary tools and chemicals is paramount for successful wasp nest removal. Here are some essential items you should consider:
- Protective Clothing: As mentioned earlier, protective clothing is vital to shield yourself from stings. Long pants, a long-sleeved shirt, gloves, closed-toe shoes, and a hat with a bandana or veil will minimize the risk of painful encounters.
- Long-Handled Tool: A tool like a broom or scraper with a long handle will enable you to reach and disrupt the nest from a safe distance.
- Wasp Killer Spray: A wasp killer spray designed specifically for these pests can be an effective chemical option. Ensure you follow the label instructions carefully when using any chemical applications.
- Boiling Water: Boiling water can also be used as a natural remedy for nest removal. By pouring boiling water on the nest, you can cause damage and eliminate wasps without relying on chemical-based solutions.
- Dishwashing Soap: Adding liquid dishwashing soap to boiling water can increase its effectiveness in damaging the nest and killing wasps.
It’s important to note that different situations might require different tools or approaches. Assess the specific needs of your situation before proceeding with the appropriate tools and chemicals for effective wasp nest removal.
For example, if you have easy access to a wasp nest hanging from a tree branch, using a long-handled tool to gently disturb the nest while wearing protective clothing might be sufficient. However, if the nest is located in an elevated area or requires additional reach, you may need to use a ladder or extendable pole along with your tools and chemicals for safe removal.
Remember, safety should always be prioritized during any wasp nest removal process. If you feel uncomfortable or unsure, it’s best to seek professional help to avoid any potential risks. Now that we’ve discussed the necessary steps and tools, let’s dive into the actual process of removing a wasp nest.
- Each year, an estimated 500,000 people visit the emergency room because of insect stings. A significant portion of these visits is due to wasp stings that occurred during attempts at nest removal.
- According to research published in 2020, there are more than 75 different species of wasps that may build nests in or around human dwellings in North America.
- A survey conducted by a pest control organization found that nearly 70% of homeowners would not feel confident safely removing a wasp’s nest without professional help.
The Process from Start to Finish
Removing a wasp nest may seem like a daunting task, but with the right approach and precautions, it can be done safely and effectively. Here’s a step-by-step guide to help you navigate the process from start to finish.
First and foremost, safety should always be your top priority. Before you begin, make sure you have the appropriate protective gear. This includes wearing long pants, a long-sleeved shirt, gloves, closed-toe shoes, and a hat with a bandana or a beekeeper’s veil to cover your face. It’s also advisable to work during cooler times of the day when wasps are less active.
The next step is identifying the location of the wasp nest. Observing their flight patterns can often lead you to the entrance of the nest. Different species of wasps have distinct nesting habits – yellow jackets prefer trees and shrubs, paper wasps hang their nests from branches or structures, hornets build nests in elevated areas, and mud daubers create mud nests under roof eaves or on porch ceilings. Understanding the specific nesting behavior will aid in determining the precise location of the nest.
Once you have located the nest, it’s crucial to choose an appropriate method for removal based on your comfort level and expertise. Several options can be considered, including pouring boiling water over the nest, adding liquid dishwasher soap to boiling water and spraying it on the nest, or using a spray pesticide specifically designed for wasp removal. The timing of the attack is essential as well; it’s best to approach the nest at night when most of the wasps are inside and less aggressive.
For instance, let’s say you have discovered a paper wasp nest hanging from a tree branch near your patio. You decide to use a chemical spray designed for wasp removal. At dusk when most of the wasps have returned to the nest, you carefully aim and spray the product directly at the nest, ensuring complete coverage. Following the label instructions is important to ensure the effectiveness of the treatment.
After the nest has been successfully removed or destroyed, it’s crucial to clean up the area thoroughly. Wasp nests can leave behind pheromones that may attract new wasps in the future. Dispose of any remnants of the nest and clean surrounding surfaces with soap and water to eliminate any remaining pheromone traces.
Now that we have covered the process of safely removing a wasp nest, let’s explore some prevention measures to consider once the nest removal is complete.
Prevention Measures Post Wasp Nest Removal
Removing a wasp nest is just the first step towards maintaining a wasp-free environment. To prevent future infestations and minimize your chances of encountering wasps again, there are several proactive measures you can take.
One important step is eliminating attractants that may entice wasps to your property. These include standing water sources, sweet or protein-rich food left uncovered, and sticky spills. Removing these attractants helps mitigate the likelihood of attracting new wasps seeking nourishment.
Additionally, consider trimming or removing vegetation that may act as harborage for wasp nests. Shrubs and bushes near high-traffic areas should be pruned regularly to reduce possible nesting sites. Evaluate if certain plants or flowers on your property tend to attract wasps more than others and consider replacing them if necessary.
Sealing potential entry points can also be an effective preventive measure. Check for gaps or cracks in windows, doors, and walls where wasps could potentially find their way in. Properly seal these openings using caulk or expandable foam insulation to create a barrier against unwanted intruders.
Furthermore, monitoring your property for any signs of new wasp activity is essential in preventing re-infestation. Regularly inspect potential nesting sites, such as eaves, tree branches, and other protected areas. Early detection allows for prompt action before the establishment of a new nest.
For instance, after successfully removing the paper wasp nest near your patio, you diligently monitor the area for any signs of new wasp activity. You regularly inspect the tree branch where the previous nest was located and promptly address any emerging wasp presence by disrupting potential nesting sites using a broom or water hose.
Taking these preventive measures helps create an environment that is less attractive and hospitable to wasps, reducing the likelihood of future infestations and ensuring a safer outdoor space for you and your family.
Attractants to Avoid
It’s important to understand the factors that may attract wasps to your property in order to prevent their presence and the establishment of nests. By eliminating these attractants, you can significantly reduce the likelihood of encountering unwanted wasp activity. Let’s explore some common attractants that you should avoid:
Sweet Foods and Beverages: Wasps are naturally drawn to sweet substances, so it’s crucial to keep food and beverages properly sealed. Avoid leaving sugary drinks or uncovered food unattended, especially when outdoors.
Protein-Rich Foods: Similarly, protein-rich foods like meats and fish can also attract wasps. Make sure to promptly clean up after barbecues or picnics, and dispose of any leftover food properly in sealed trash bins.
Open Trash Containers: Wasps can be drawn to open trash containers that contain discarded food or other organic waste. Ensure that your trash cans have tightly fitted lids, and consider using ones with built-in traps to further deter these pests.
Sticky Spills: Any sticky spills, such as sugary liquids or syrupy substances, should be cleaned up immediately. Wasps are known to be attracted to sticky surfaces, so quick action is essential in preventing their interest.
Standing Water: Stagnant water sources can act as breeding grounds for certain wasp species. Regularly check your property for areas where standing water may accumulate, such as clogged gutters or flower pots. Fixing these issues will not only help prevent wasp nesting but also reduce the presence of other pests.
For instance, Joe had a problem with wasps continually appearing near his outdoor dining area. After realizing that his children often left behind sticky popsicle stains on the table overnight, he began promptly cleaning up after each meal and wiping down any spills immediately. This simple change significantly reduced wasp activity around his patio.
By being mindful of these common attractants and taking necessary precautions, you can create an environment that is less appealing to wasps and minimize the chances of them establishing nests on your property.
Now that we’ve covered attractants to avoid, let’s move on to the importance of regular surveillance to detect new wasp nests in a timely manner.
Regular Surveillance for New Nests
Being proactive and regularly monitoring your property for signs of new wasp nests is crucial in controlling infestations before they become a more significant issue. By spotting nests early on, you can take appropriate action to remove them safely and prevent potential stinging incidents. Here are some key steps to follow:
Observing Flight Patterns: Take the time to observe the flight patterns of wasps around your property. This can provide valuable clues as to where their nest might be located. Keep an eye out for repeated patterns or groups of wasps flying together in a particular area. These observations will help you narrow down potential nesting spots.
Inspecting Common Nesting Areas: Different species of wasps have different preferences when it comes to nesting locations. Conduct thorough inspections of areas known to be favored by specific types of wasps. For example, yellow jackets tend to nest underground, while paper wasps often choose protected areas such as shrubs or tree branches. Understanding these behaviors will aid in locating nests more efficiently.
Think of surveillance for new wasp nests like conducting regular check-ups for your home’s security system – by consistently monitoring for any signs of entry points or vulnerabilities, you can address them before they become serious threats.
Using Protective Gear: When conducting surveillance or inspecting potential nesting areas, it is crucial to protect yourself from possible stings. Wear long sleeves, pants, gloves, and a hat with a bandana covering your face. This will minimize the risk of getting stung if there is aggressive wasp behavior during your search.
Documenting Findings: Keep a record of any potential nesting areas you identify during your surveillance. Note the date, location, and any distinguishing features that might be helpful when it comes time to address the nests. Having accurate documentation will assist you in planning and taking appropriate action.
If you spot any suspicious nesting activity or find a new nest on your property, it’s important to address it promptly. Depending on factors such as the size and location of the nest, you may choose to handle its removal yourself or seek professional assistance if needed.
Now that we have explored the significance of regular surveillance for new wasp nests, it’s time to understand how to safely remove them when detected.
Call Bee Smart Pest Control!
Are you in need of extermination services? Contact Bee Smart Pest Control! We offer many pest control programs to keep your home safe year-round, and Bee Smart Pest Control will help you get a personalized solution. Bee Smart Pest Control is a local business, so we understand the nuances of Colorado pest control and use chemicals that aren’t harmful to your family or pets. We pride ourselves on our safety and ability to relate to our customers on a personal level. Contact Bee Smart Pest Control online, or call us at 720-937-0527, to get a solution for your exact pest control problem today!